If you've recently purchased a wood lathe, you've probably wondered how to operate it. Here are some tips to get you started. Don't let jewelry or clothing get in the way of the lathe. Keep your hair trimmed and shorten. Long hair can cause a kink in the cutting tool's path. Rotate the headstock before you turn on the lathe to ensure there is nothing blocking your view. Secure the tool by ensuring that the post of the tool is not too far from the workpiece.
A tailstock is a tool that can be used to help you work.
You can use a tailstock to operate a metal- or wood lathe in a number of different ways. You first need to locate your tailstock on the lathe. Once you have the tailstock in place, you can feed your cutting tool through its lead-screw. A Morse taper mounting is also included on the tailstock. If you plan to do any heavy work, you will need to use a lathe to stabilize your tailstock.
Next, you'll need to decide what kind of project you'd like to work on. A wood lathe is the best choice for smaller projects. A small piece of stock and a slow speed setting will help you get to know the machine and how to use it. Once you have this down, you will be able to move on to harder and larger pieces of lumber.
Getting comfortable with the spindle
Getting comfortable with the spindle is a fundamental skill you should develop when operating a wood lathe. Make sure your work piece is aligned between the lathe's center lines. You must ensure that the wood is at the top of the headstock spindle as well as inside the spur. This will ensure that you do not accidentally damage the wood.

Once you have established the center point of your workpiece you can start turning the wood at the speed you prefer. You will need to adjust the spindle's speed to achieve the desired effect. Also, ensure that your workpiece is secure between the tailstock and the center. It is also important to ensure that your tool rest is at the right height to cut the wood. The tool rest should be removed from the spindle so that the workpiece can be sanded and polished.
Getting a feel for the speed control
To make sure your wood lathe is a success, you need to get a feel of its speed control. Whether you're looking to turn bowls or baseball bats, you'll want to get a feel for the speed control's range before you start experimenting with it. Wood lathes can be dangerous, so remove jewelry and other loose clothing before using them.
A good way to get a feel for the speed control is to turn objects that are smaller than the diameter of the headstock spindle. Avoid turning large objects, as they could interfere with the bed. You'll soon become proficient at turning different shapes and sizes. Also, you'll learn the basics of speed control and what parts are sensitive.
Smooth turns
The key to a smooth turn on a wood lathered work piece is to use the correct tool. A gouge can be used on the turning lathe to cut a square piece of wood. A gouge features a U-shaped or C-shaped cutting tip and can quickly remove large chunks of wood. To cut in tighter areas, many gouges have a turn on the edge. Many woodworkers use several different sizes of gouges when working with a wood lathe.
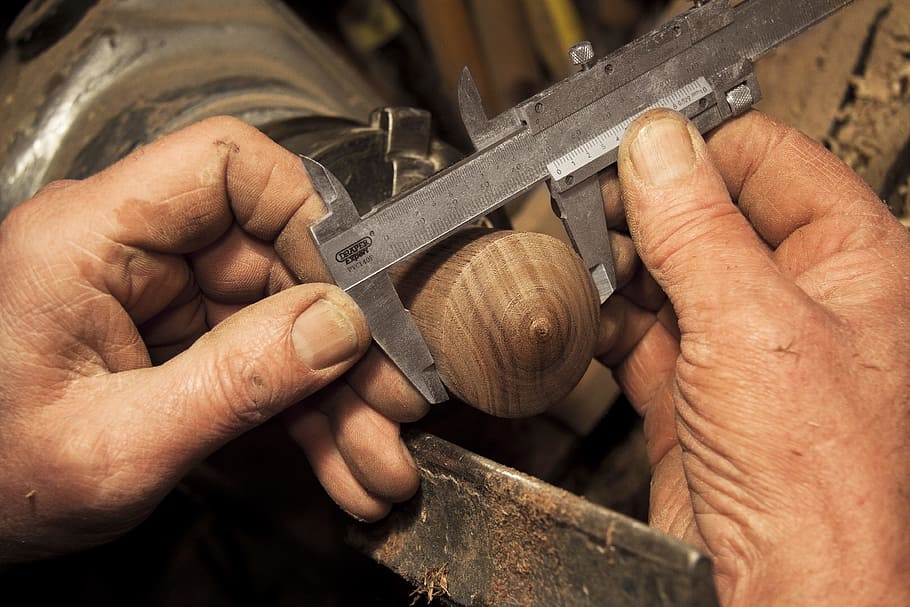
Before you begin turning, you should measure the diameter of the piece to be turned. A caliper is a good tool to measure the diameter of the workpiece. You should check the diameter frequently to ensure it is accurate. Once you have verified the diameter, take the workpiece off the lathe. If you find any parts connecting the workpiece to a lathe, remove them.
The right lathe

You will find many different types of wood turning lathes on market. The smallest of these are called mini lathes. They are usually portable, but also suitable for small woodworking projects. The stationary midi wood lathes can be moved around by having wheels. Full-sized ones are the largest. While they were traditionally used by professional woodworkers, they are now popular among woodworkers of all levels.
The manual is a must-read before you can start to work with your new tool. If you're just beginning to use the wood turning lathe, it is best to start at the lowest speed setting. This will allow you to feel the resistance from the tool. After mastering this function, you will be able to move up to a faster speed setting. Your operating manual for a wood turning lathe is the most important guide. Please read carefully and take note as you use it.
FAQ
What's the time taken to finish a piece furniture?
It all depends on how large the furniture is. A smaller project like picture frames or boxes can be completed in a single day. Larger projects like dining tables and desks require several days. It takes time and effort to properly stain the wood.
What is the minimum investment a hobbyist needs to make in order to get started?
It is likely that you will need some capital in order to buy the required tools and supplies if your goal is to open your own woodworking business. The best place to start is by buying a small drill press, circularsaw, circular saw or sanding machine. These items won't break the budget and aren't expensive.
Where can I purchase hardwood lumber?
Home Depot can sell hardwood lumber. They offer a wide range of wood products including flooring, cabinets, furniture and more.
You can also find a large selection of engineered hardwoods like Ipe (Araucaria Angustifolia), Brazilian Cherry, and Mahogany in their collection (Swietenia Macedonilla).
You can search Google for hardwood lumber to find them online.
Statistics
- If your lumber isn't as dry as you would like when you purchase it (over 22% in Glen Huey's opinion…probably over 10-15% in my opinion), then it's a good idea to let it acclimate to your workshop for a couple of weeks. (woodandshop.com)
- The U.S. Bureau of Labor Statistics (BLS) estimates that the number of jobs for woodworkers will decline by 4% between 2019 and 2029. (indeed.com)
- Most woodworkers agree that lumber moisture needs to be under 10% for building furniture. (woodandshop.com)
- Woodworkers on the lower end of that spectrum, the bottom 10% to be exact, make roughly $24,000 a year, while the top 10% makes $108,000. (zippia.com)
External Links
How To
How to stain wooden surfaces
Staining wood is the process of applying chemicals to the wood's exterior, which alters its color. The wood will turn from white to brownish-red due to the chemical reaction. Although oak is the most popular type of wood to stain, there are many other types that can be used.
You can apply wood stains in many different ways. One method involves mixing the stain and a solvent and then spraying it on the wood. Other methods use a solution of water and dye applied directly to the wood. You can also mix stains with varnishes or paints so that they become part the finish coating.
Preparing the surface for staining wood is the first step. The wood must be thoroughly cleaned to remove all grease and dirt. Sanding the wood removes scratches and imperfections. Next, you need to decide which stain you want. There are two main types of stain: non-penetrating and penetrating. Penetrating and non-penetrating wood stains penetrate deeper than other types, making them perfect for dark colors like mahogany. The best non-penetrating colors are those that work with light colors like maple.
Once you have decided on the stain type that you want, get your tools ready. A paintbrush works well for applying stains because it allows you to spread the liquid evenly across the surface. You should also have some handy rags to wipe up excess stains after you finish painting. If you plan on mixing the stain yourself make sure that you have enough containers to hold the different components.
Once you have prepared your materials, start by cleaning the area where you plan to stain the wood. Use soap and warm water to remove dust and grime. Wipe the entire piece of furniture with a rag dampened with clean water. Take care to remove all debris and dirt, especially if you are planning on staining darker wood.
Next, spray the stain. Start at one end of the piece of furniture and brush or spray the stain onto the wood. You should work slowly and carefully. Continue moving along the grain until you reach your opposite end. Make sure that the stain does not drip off the edge of the wood. Before you proceed with the next steps, let the stain dry completely.
To protect the painted surface, apply a coat of clear polyurethane sealant. Apply three coats polyurethane sealer. Allow the third coat of polyurethane sealer to dry overnight before applying the final coat.