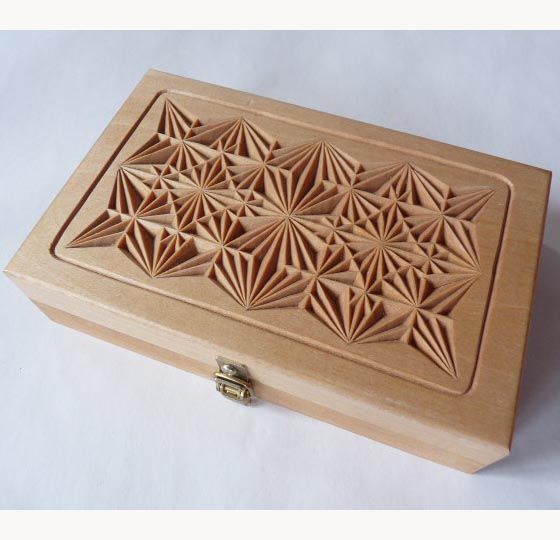
There are several options for woodcarving if this interests you. You can print these patterns, which will make the process even easier. Start with basic geometric patterns. Once they become proficient in carving, they can move to other patterns like flowers or animals. In this article, we'll look at several examples of woodcarving patterns. These are the top patterns that you can use for learning the art.
Fine Woodworking by Dremel: Detail Engraved Flower
The Detailed Engraved Flower from Finewoodworking by Dremel is a great option for crafting projects. These rotary tools, often referred to as Dremels, are the perfect tool for engraving and detailing. They are simple to use. Simply set the speed dial, and then press the button at the top of the unit. The speed dial determines how much material can be removed when carving wood surfaces.
Frank C. Russell detailed engraved flower
"Detailed Engraved Flower by Frank C, Russell" has been reproduced nationally and internationally. Although Russell's output was not entirely documentary, much of his early work was based on fresh first-hand observation. His later works combine secondhand and fictionalized information. They are, rather, representations of a life that is part myth and part fact, with no definitive proof of the narrator.
The artist's early work, "Detailed Engraved Flower from Frank C. Russell," is a shining example of his talent. This small work is composed of an ivory grip with a bull's head and dates from 1911. It measures only a few millimeters in length. This work of art was created in memory of his mother, who had already died.
Tumbled Rose Details Engraved Flower
Tumbling Rose's Detailed Engraved Flowers is a stunning wood carving pattern. This flower looks simple, but is actually composed of intricate petals. The intricate details make it a wonderful project for the novice carver. Stock photos only show small parts of the engraved flower. You might find some that work better than others. Tumbled Rose has a wide range of sizes for detailed engraved flowers, from large to small.
FAQ
Do I need to be a genius to succeed in woodworking?
No. It is not rocket science to woodwork. It is possible to learn basic tools and techniques that will allow you to create beautiful art.
What tools work best for me?
It is important to consider your needs and preferences when shopping for tools. Are you more comfortable with plastic or metal handles? What size screws and nails do you use most often? Do you prefer to use hand tools or power tools?
What are the basics of woodworking?
It is an excellent way to learn how to build furniture. You can make a simple bench yourself. This project can be completed with whatever wood you have available at home. If you're not sure which kind of wood to choose, you can purchase cheap pine boards at Lowes and Home Depot. After you've built your bench, you'll want to sand off all the rough edges and finish it with a stain or varnish.
How long does it take to finish a piece of furniture?
It all depends upon the size of your piece of furniture. Boxes and picture frames are small projects that can be completed in one day. Larger projects such as tables and desks can take several days to complete. It takes time and effort to properly stain the wood.
Statistics
- If your lumber isn't as dry as you would like when you purchase it (over 22% in Glen Huey's opinion…probably over 10-15% in my opinion), then it's a good idea to let it acclimate to your workshop for a couple of weeks. (woodandshop.com)
- The best-paid 10 percent make $76,000, while the lowest-paid 10 percent make $34,000. (zippia.com)
- Overall employment of woodworkers is projected to grow 8 percent from 2020 to 2030, about as fast as the average for all occupations. (bls.gov)
- Most woodworkers agree that lumber moisture needs to be under 10% for building furniture. (woodandshop.com)
External Links
How To
How to stain hardwood
Staining wood can be described as a process where chemicals are applied to the wood surface. This causes the wood to take on a new color. This chemical reaction causes wood to turn from whiteish to brownish. While oak is the most widely used type of wood for staining purposes, other types of wood are also available.
There are many ways to stain wood surfaces. You can mix the stain with a solvent, such as turpentine, and spray it onto the wood. Some methods involve a mixture of water and dye that is applied directly to the wood. Stains can also be mixed into paints and varnishes, becoming part of the finish coating.
Preparing your wood for staining is the first thing to do. Clean the wood to get rid of any grease, dirt or other substances that might be detrimental to the stain's application. Sanding the wood removes scratches and imperfections. Then you must decide what kind of stain you want to use. Penetrating stains are different from non-penetrating. Penetrating stains penetrate deeper into the wood than non-penetrating ones, making them ideal for dark colors such as mahogany. Non-penetrating oils work best when used with light colors, like maple.
Once you have decided on the stain type that you want, get your tools ready. Because you can spread the stain evenly with a paintbrush, it is ideal for applying them. After you're done painting, make sure to have some rags handy to remove any excess stain. If you plan on mixing the stain yourself make sure that you have enough containers to hold the different components.
After you have prepared your materials, clean the area you intend to stain. You can remove grime and dirt with warm water and soap. Use a dampened sponge and warm water to clean the entire piece. Take care to remove all debris and dirt, especially if you are planning on staining darker wood.
Next, spray the stain. Begin at one end and spray or brush the stain on the wood. Move slowly and carefully along the grain of your wood until you reach its opposite end. Keep the stain from dripping off the wood's surface. Before proceeding to the next step, let the stain dry thoroughly.
Apply a clear polyurethane sealant to protect the painted surface. Three coats of polyurethane sealing agent are required. Allow the third coat to dry overnight before sanding the final coat.